We switched jobs around here since the last time we posted stuff. We're bringing in way less money now -- which isn't a bad thing, since we're happily doing new work -- but, it has impacted our high-flying, high-roller lifestyle when it comes to the food budget. This new scheme really suits our true natures. We're both into deals.
So, while we are looking to save a bunch of money every month on our food budget, it's not at the expense of quality. Really: it just means that we're not going out much. I used to go out for just about every meal, every day: definitely breakfast and lunch, and often dinner. Now we make everything. Just doing that, even while buying fancy organic free range grass fed well adjusted meat, makes all the difference.
So, expect to see some cheap, but good stuff here.
First one is a John version of my mom's Braciole. Mom's recipe calls for all sorts of high-zoot stuffing (pecorino, soprasata, ground veal, etc). I swapped out ground pork sausage and swiss. Next time, I'll leave the swiss cheese out and add a layer of hearty greens and some chicken liver. And I'll probably get non-seasoned ground pork and put some dried porchinis, Cognac, and my own spices in there.
We had sage, but no parsley. And instead of the stock-based braising sauce, I just used some fresh marinara -- that hadn't been cooked down/thickened yet.
Good stuff. My mom would approve. As she would say, "make it your own!"
This is good as a main dish, but it's friggin' crazy awesome as a sandwich filling the next day with some spinach, mayo, and jalapenos.
I used beef round, which is generally a pretty useless cut of beef. But it was on sale at Super 1 for $2.48/lb! Word. I got one dinner out of this and 4 lunches. I figure I was in it around about $13. Not bad.
Anyway, for the round: cut it thin and pound it out. Let it rest. Then pound a bit more. Use string to tie these guys up.
Poor man's charcuterie.
Showing posts with label mom. Show all posts
Tuesday, September 25, 2012
Sunday, January 9, 2011
Cheater's Chilito
This is another recipe that my mom learned from the Senoritas.
It's a salsa made from dried chilies. It's one of my favorite salsas and with so many different dried chilies available now, it's fun to play around with. I call it "Cheater's Chilito" because this is a faster way to make it than how my mom taught me.
Her method uses a mortar and pestle to grind the ingredients into a paste. She also used 3 fresh tomatoes instead of the paste I use here. If you use tomatoes, substitue three peeled, seeded, and chopped tomatoes for the paste. It's better than the paste, especially if you have fresh tomatoes. But paste works too.
Mom would approve on two fronts: making the recipe your own, and "doing what you need to do to make it work."
Find any dried pepper and experiment -- dried chipoltes is always an easy winner. I like to start with chile de árbol for a little heat, then add a milder, more complex chili to compliment. Usually I have New Mexico chilies around, but today I found some anji panca chilies, which, apparently are from Peru. It turned out nice, dare I say just a tad fruity?
This makes about 1/2 cup.
Stuff
It's a salsa made from dried chilies. It's one of my favorite salsas and with so many different dried chilies available now, it's fun to play around with. I call it "Cheater's Chilito" because this is a faster way to make it than how my mom taught me.
Her method uses a mortar and pestle to grind the ingredients into a paste. She also used 3 fresh tomatoes instead of the paste I use here. If you use tomatoes, substitue three peeled, seeded, and chopped tomatoes for the paste. It's better than the paste, especially if you have fresh tomatoes. But paste works too.
Mom would approve on two fronts: making the recipe your own, and "doing what you need to do to make it work."
Find any dried pepper and experiment -- dried chipoltes is always an easy winner. I like to start with chile de árbol for a little heat, then add a milder, more complex chili to compliment. Usually I have New Mexico chilies around, but today I found some anji panca chilies, which, apparently are from Peru. It turned out nice, dare I say just a tad fruity?
This makes about 1/2 cup.
Stuff
- Some dried chilies. For example: 6 chile de árbol and 4 anji panca chilies.
- Pinch of dried oregano
- 1 clove garlic
- Pinch of kosher salt
- about 2 teaspoons tomato paste
- Heat a thick cast iron pan on medium heat. Mom used a comal -- which is like a cast iron pan without sides.
- Put the dried peppers in the pan and slowly heat them. Turn them every few minutes. The idea is to get them slightly colored and to drive out any remaining moisture. The chile de árbol will be done before the bigger peppers, which will puff up a bit as they gently char.
- Remove the stems and put the chile de árbol in a coffee grinder. Grind into a powder. (If you don't have a coffee grinder specifically for spices a good way to clean out the coffee stuff is to put a hunk of bread in there and grind it up. That will clean out the coffee bits).
- Once the bigger peppers are done, you'll need to open them up and remove the seeds. Then grind the skins in the grinder.
- (Optional) Put the seeds in the pan and give them a light toast -- reserve those too. I have a jar of toasted random chili seeds and bits of charred skin. When I need chili powder, I grind some up.
- Put the ground chilies in a small bowl.
- Mince the garlic. Then put a pinch of the kosher salt on the garlic and crush with the side of the knife until it's nearly a paste. Add the garlic to the bowl of ground chili.
- Add the thyme and the paste to the bowl.
- Add just enough boiling water to mix it all up into a paste -- about 1/4 cup. Mix it up and let it sit for an hour or so.
Friday, December 17, 2010
Ad hoc pork carnitas
I used to be really into charcuterie. A few years ago, I wound back my meat eating to almost nothing. Pork is the cornerstone of great charcuterie and is something we rarely eat now. Of course any time we go to breakfast, Maddie gorges on bacon, but otherwise, we're pretty much a pork-free house.
This time of year I can't help myself. I gotta make at least one holiday pate. So there's pork around.
I started a country pate tonight -- I ground some pork butt and added a bunch of goodies to marinate into a forcemeat.
I had a bit of pork butt left over. So I made carnitas. Yum.
When my mom was about 45(?) she went to California Culinary Academy for two years. Part of her training was an externship. I don't know why cooking schools call what everyone else calls an "internship" an "externship," but they do. Anyway. My mom spent 6 months or so working at the Jordan Winery where she worked with some hotshot chef guy to put out big fancy dinners for high rollers.
But she said the best part of that job was working during the days in the kitchen with the Senoritas. Aside from prepping and helping the hotshot chef the Senoritas' main duties were making sure the pickers, growers, and farmhands were well-fed. Since all these guys were Mexican, it made sense that Mexican women ran the "work" kitchen. So my mom ended up learning great Mexican cuisine from the Senoritas.
And she really learned the cuisine. She came out of there cooking amazing Mexican food with the same comfortable, second-nature ease that she had when she whipped out a roasted chicken or a quick French loaf. Mexican was my favorite of all the "new" stuff Mom learned in her time at CCA. And this particluar recipe makes me happy this time of year.
She showed me this carnitas recipe about 10 years ago when we were doing some Christmas charcuterie cooking. Everyone was gone doing Christmassy shopping and running around. We had a bit of pork left over and she knocked this little cook's treat out and we enjoyed it in a quiet house after cleaning up. These are great to eat right out of the pan, or laid out onto tortillas as I've done here -- with whatever you have on hand.
This makes enough for two to four people to snack on.
Stuff
This time of year I can't help myself. I gotta make at least one holiday pate. So there's pork around.
I started a country pate tonight -- I ground some pork butt and added a bunch of goodies to marinate into a forcemeat.
I had a bit of pork butt left over. So I made carnitas. Yum.
When my mom was about 45(?) she went to California Culinary Academy for two years. Part of her training was an externship. I don't know why cooking schools call what everyone else calls an "internship" an "externship," but they do. Anyway. My mom spent 6 months or so working at the Jordan Winery where she worked with some hotshot chef guy to put out big fancy dinners for high rollers.
| This is so easy it's just crazy. I put red peppercorns in it cause I had them. Red peppercorns are hard not to put in just about everything. |
But she said the best part of that job was working during the days in the kitchen with the Senoritas. Aside from prepping and helping the hotshot chef the Senoritas' main duties were making sure the pickers, growers, and farmhands were well-fed. Since all these guys were Mexican, it made sense that Mexican women ran the "work" kitchen. So my mom ended up learning great Mexican cuisine from the Senoritas.
And she really learned the cuisine. She came out of there cooking amazing Mexican food with the same comfortable, second-nature ease that she had when she whipped out a roasted chicken or a quick French loaf. Mexican was my favorite of all the "new" stuff Mom learned in her time at CCA. And this particluar recipe makes me happy this time of year.
| Pretty much done, but a guy could cook this for another 15 minutes or so. |
She showed me this carnitas recipe about 10 years ago when we were doing some Christmas charcuterie cooking. Everyone was gone doing Christmassy shopping and running around. We had a bit of pork left over and she knocked this little cook's treat out and we enjoyed it in a quiet house after cleaning up. These are great to eat right out of the pan, or laid out onto tortillas as I've done here -- with whatever you have on hand.
This makes enough for two to four people to snack on.
Stuff
- One pound pork butt or blade steak, cubed into small bite sized bits.
- Some or all of the following: 3-4 dried peppers, 2 bay leaves, 1 TB dried oregano.
- Put the pork and spices in a heavy saute pan or cast iron pan and just cover with water.
- Cook on medium-high until water gently boils away.
- Turn heat to medium-low and let the fat render out of the pork. The idea now is to slowly fry the pork in its own fat at low heat for at least 30 minutes.
- When all the little pork bits are crusty and yummy it's done.
Saturday, December 11, 2010
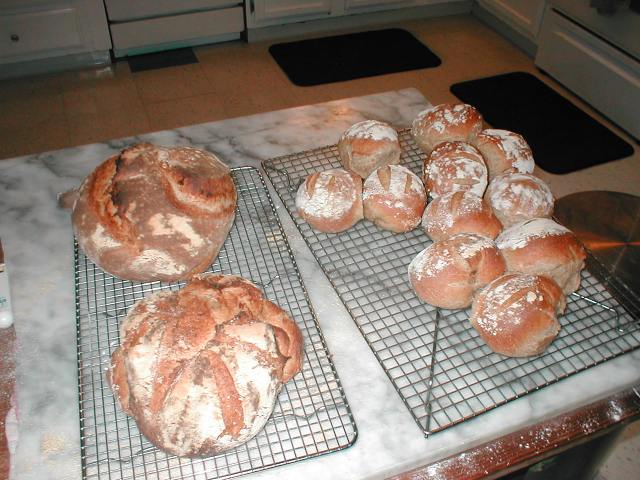
New year's resolution: bake bread again
I used to do a lot of baking. About 8 years ago I started Owen, which was the name for our natural yeast starter. I really got into attempting to bake artisan-style breads. I never really nailed it. I made bread that was great and I really loved, but I've never totally and utterly nailed the bread that I wanted to. I'm not sure if I ever will.
About 3 years ago I stopped making our regular bread. Even though we dialed in a great process which really minimized our time dealing with the bread, we just got too busy with other stuff and I reluctantly dropped the bread out of our daily routine to balance out other stuff. Plus, we had my mom cranking out amazing breads. So it wasn't a huge loss since we still had great bread all the time.
My mom grabbed a bit of Owen about a year after I had started it and she subsequently baked all of her breads with that same starter. She made a great ciabatta.
Mom always made great bread. When we were kids she always made this really super hearty whole wheat loaf. It's all the bread we had - I'd make these giant sandwiches out of thickly cut home made bread and be embarrassed opening it up at lunch it as my buddies unwrapped their tidy little Wonder bread delights.
My mom died a few months ago. Recently, my sister and I went through my mom's kitchen stuff and took a few things. The biggest thing I took, certainly the heaviest, was her old Hobart mixer. It's the perfect size for a home baker. Given the huge size of the Hobart, it probably seems grandiose on the surface, but the fact is, if you get into rustic/artisan/substantial breads, you will go through mixers like crazy. I've killed two. One was a super 6 quart Kitchen Aid, the other was a normal 5 quart Kitchen Aid. And these were the "heavy duty" ones. They just can't turn a sizable substantial dough. And by Hobart standards, this one is dinky. But it's perfect for the home.
This Hobart will allow me to make an easy 6 loaves at a time. Mom would do 12, but she sold her bread. Quickly. I usually keep 1/2 and give away 1/2.
Tuesday, November 23, 2010
Chicken liver omelet
One of the first things my mom taught me to make was a chicken liver omelet. I've always been a freak for chicken liver.
Fun fact: Did you know there was a time in the late 70's when you could get a liver bolognese at the Spaghetti Factory? Can you imagine how great that would be today? There was also a Sundae Burger at the Onion at about the same time. I think it was #33. We didn't go out much when I was a kid, but when we did, I did it up.
Anyway. Mom taught me to make a chicken liver omelet when I was 4 years old. My parents had divorced and I lived with my sister and mom in a little 2-room house in Onion Creek, Washington. The house was quaint in that non-running water, non-electrified, out house kind of way. So mom taught me how to cook an omelet on a wood cook stove.
That was the beginning of my love of big thick steel for cooking. Nearly everything was cooked either in a cast iron pan or in the case of quesadillas, right on the stove top.
I love wood cook stoves. Very versatile: you have this big hot platform where you can boil water on one section, keep something warm on another, fry on another, all while baking in the oven. They rule and once you get to know them, they are very dial-in-able.
About 8 years ago, I got my dad to bring me an old chestnut for baking. Once we got it dialed in, the baking was great, but we also found it great for making jam and other outdoor cooking projects. If we had a bigger place, we'd still have a wood cook stove.
Anyway. Thanksgiving time is about the only time I have a liver omelet anymore. Liver isn't on the menu here much. If I were making this for guests, I'd make this a bit different. I'd cook it in a proper omelet pan to make sure I could easily turn the egg to cook it 'merican style without browning it.
I like a bit of wet to my omelet. In my experience, wet liver omelets don't go over so well with family and friends. But whatever -- this recipe makes it right -- for me and in the memory of my mom, who appreciated the same preparation: in a cast iron pan, cooked from the bottom till it browns a hair and folded onto the plate. With cheddar of course. Normally we'd use chicken liver, but this is with turkey liver.
Stuff
- A bit of liver. If you are using chicken liver, then 3 livers is about right. For turkey, maybe 2. Cut the turkey liver into chicken liver sized chunks (think fig size... for lack of a better example)
- Onion or shallot, about a teaspoon minced. (optional, we didn't do this back in the day)
- Butter. Canola oil.
- Couple tablespoons of shredded cheddar
- S&P
- Two eggs, beaten with a splash of milk
Method
- Warm your cast iron pan on medium high heat.
- Season the room temp liver with a dash of salt and pepper.
- Add a hearty teaspoon of butter to the pan. Add a dash of canola oil to keep the butter in check.
- Fry the onion/shallot for a minute or two to soften.
- Add the liver to the hot pan. It should sear. Put a screen over the pan. Sometimes liver likes to blow up. Consider turning the heat down if there's a lot of noise and activity in the pan.
- Cook until the liver starts to bleed a bit. Good fresh liver from a source you trust can be cooked until it's just pink in the middle. Don't over cook it. It will cook a bit more in the omelet. Pull it off the heat and wipe out your pan. You may need to let the pan cool for a minute or two.
- Turn the heat down to medium.
- Put another hearty teaspoon of butter in the pan. It should sizzle, but not brown immediately. If it browns immediately, you're still too hot.
- Pour the egg in the pan and do the omelet thing where you push the egg towards the center to cook the liquid egg. Do this until the egg sets.
- Lay the liver down the middle of the omelet, sprinkle with cheddar, season a bit with s/p.
- Roll the omelet out onto a warm plate.
- Eat with toast.
Subscribe to:
Posts (Atom)